
APOCALYPSE FRAME
How to run APOCALYPSE FRAME on roll20
(Updated 5/13/22)
Hi there! Not a development log for once. This is just a thread about how to run AF online on roll20. (There’s no character sheet for roll20 yet, but making one is on my backlog.)
After running this in person for months, my home group has gone remote again, at least for now. This isn’t a problem - we’d played remote for about a year and change until everyone was vaccinated - but last time we played remote, we weren’t playing something that needed a grid. We are now.
So let’s talk about how to set an AF game up on roll20.
Tokens
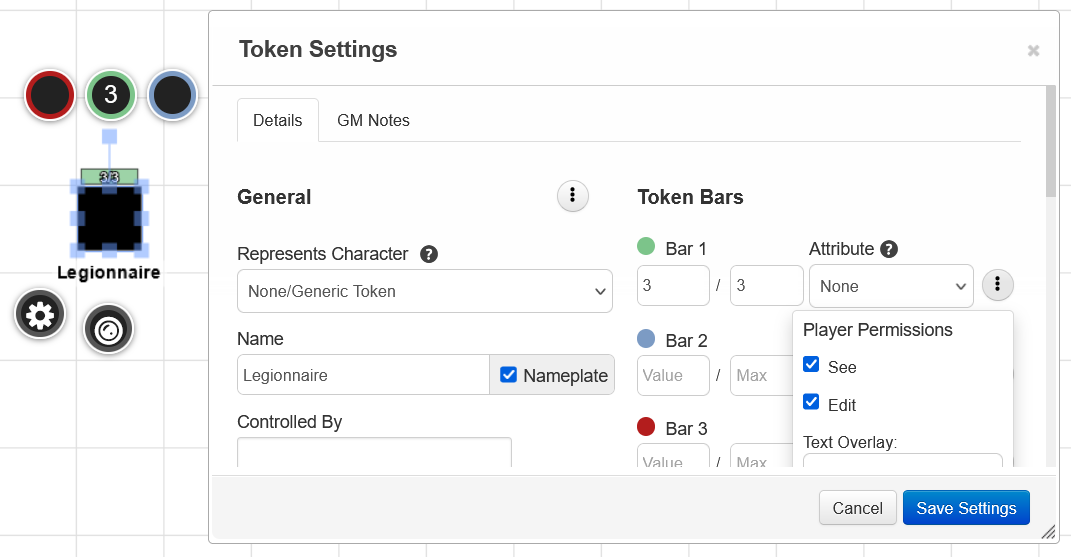
Get a few tokens ready. Any tokens you prepare first will make your life easier (you’ll see later).
I recommend green for Vigor, blue for Tension, red for Ammo. That way the stat bars stack vertically like the character sheets in the book: Vigor on top, Tension in the middle, Ammo on the bottom.
Set names/nameplates, set stats, make those stats visible (it has to have a minimum and a maximum listed for the token stat bar to show up). I recommend making one token for each distinct kind of enemy you intend to use in addition to one per Ace.
The Map
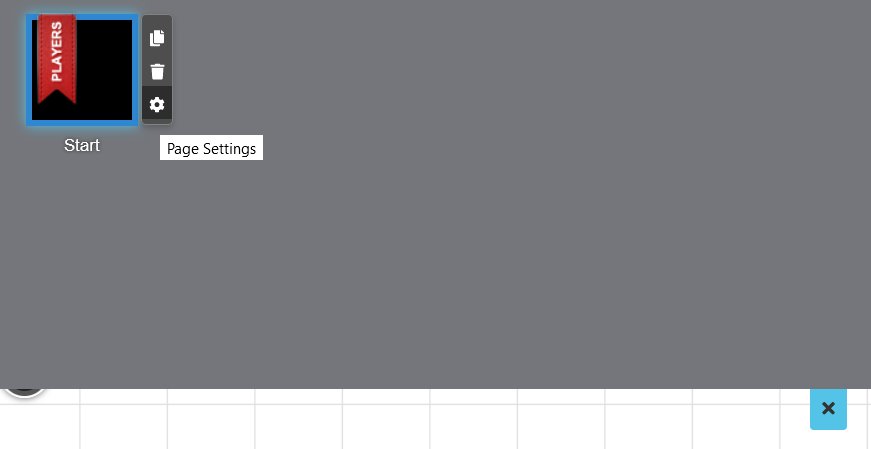
Now, we need to make the map into hexes. Click the blue page icon near the top right of the screen (which says Page Toolbar on mouseover), and when it drops down, click the gear next to the page you’re on (which says Page Settings).
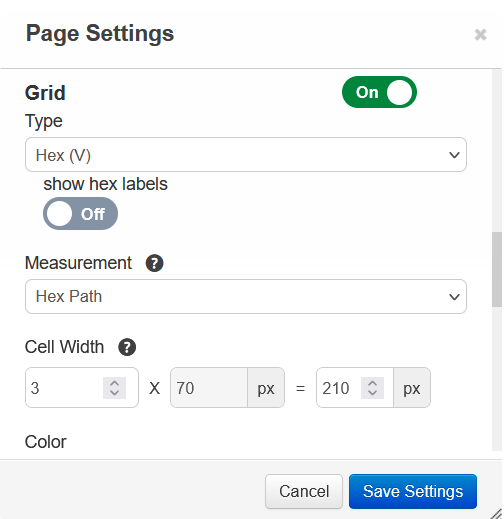
Once in that page, scroll down to Grid, then click the dropdown that says “Square”. You’ll see options for Hex (V) and Hex (H), choose your preference.
Once you can see hexes on the map, upload the below picture like it’s a token, then, holding alt, drag it onto the map. This is going to be your background.
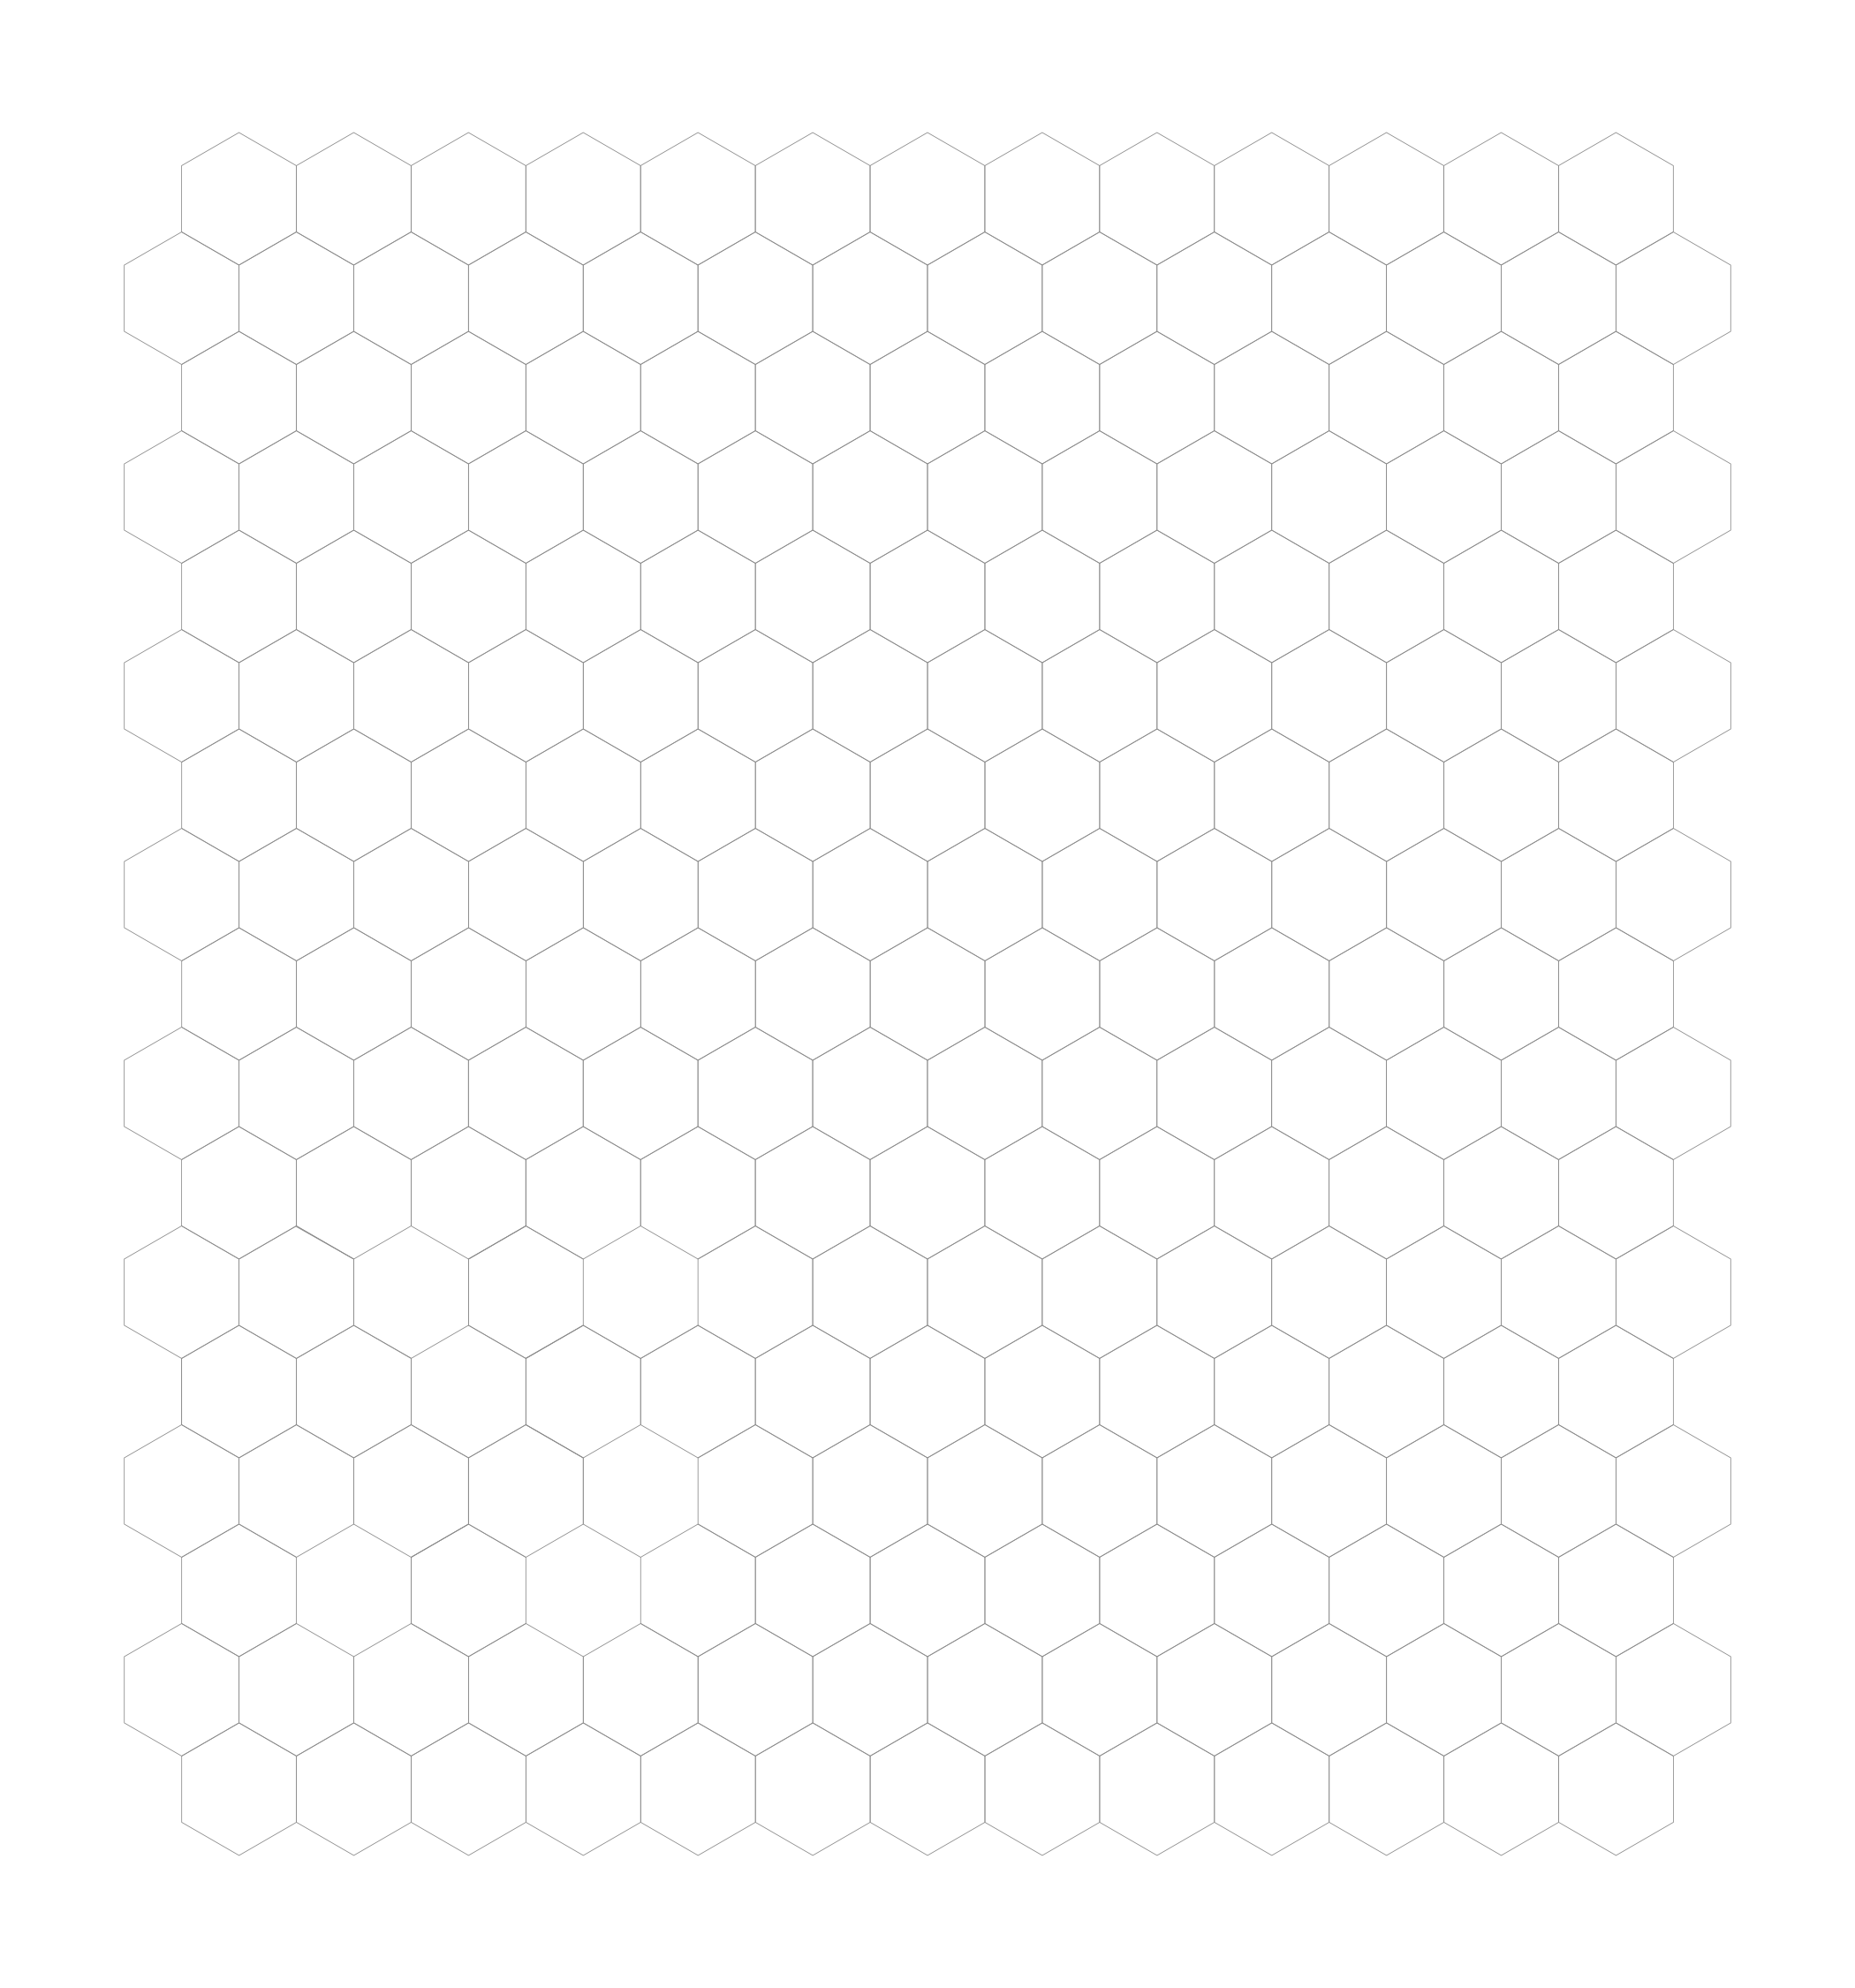
(Rotate it 90 degrees first if you’re using horizontal hexes.)
Still holding alt, drag the corner out and make it as big as you like - each hex should cover about 5-7 hexes’ worth of area. Right-click it -> Layer -> To Map. You should now see the grid lines again - go back to your grid settings and make the opacity 0. Now you have a grid that has a bunch of snap points for every hex.
This is also a good time to increase the map size vertically.
**Outdated instructions (version prior to 5/13/22)**
Now, we need to make the map into hexes. Click the blue page icon near the top right of the screen (which says Page Toolbar on mouseover), and when it drops down, click the gear next to the page you’re on (which says Page Settings).
Once in that page, scroll down to Grid, then click the dropdown that says “Square”. You’ll see options for Hex (V) and Hex (H), choose your preference. Then, set the Cell Width multiplier, which starts at 1, to something larger (2.5 - 3 is probably best.)
If you made tokens earlier, the advantage is that they’re now all the appropriate size of “smaller than the grid”. If you bring in new tokens, roll20 will unhelpfully scale new tokens with that Cell Width. If you have to do it anyway (which happens at least 1/session for me), hold alt while dragging the new token onto the map and while resizing and it won’t just snap to the grid size.
This is also a good time to increase the map size vertically.
Keep an enemy token of every kind and any info you want to display about them at the bottom of the map, cordoned off. If you want to make more, copy/paste them - if you’ve already set them up with stats this’ll be easy.
I also like to give a rook icon to Armored enemies for easy visual acknowledgement. For Shields, I like to use one of the colored dots. You can display a number on an icon by mousing over the selected icon and typing the number.
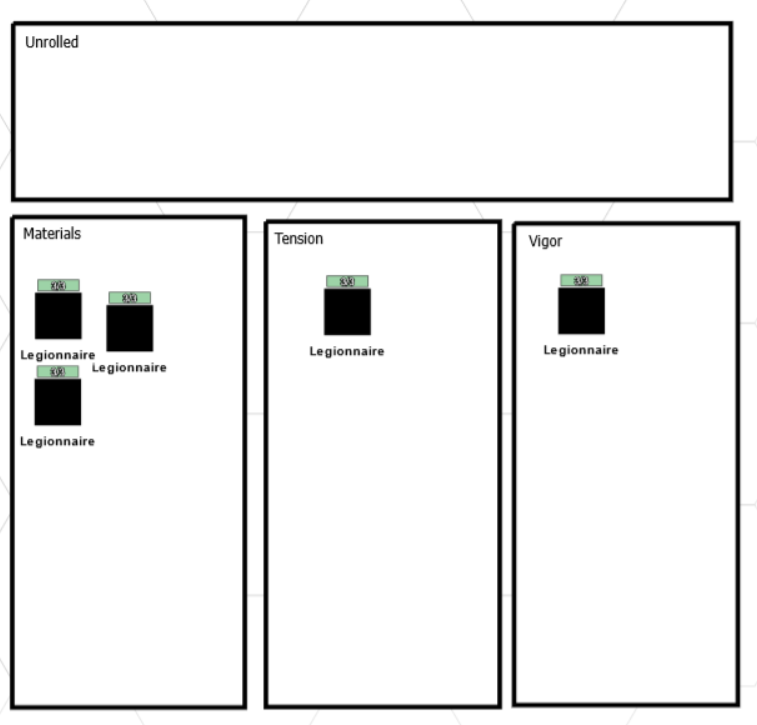
I highly suggest you set up a drop zone. This is just somewhere to put various drops: unrolled, Materials, Tension, Vigor. When an enemy is taken out, put them into the unrolled bin. When drops are rolled, put the appropriate number of enemy tokens from unrolled into the appropriate bin. When they’re claimed, delete the tokens.
General tips
To roll X dice and take the highest, /roll Xd6kh1 is the command you want. (If rolling 0 dice, /roll 2d6kl1.)
When rolling drops, roll d3’s (1 = materials, 2 = tension, 3 = Vigor). It’s the same thing and you’ll be able to pick them out faster because 1’s, 2’s, and 3’s are going to be colored differently.
To make tokens not snap when either scaling or moving them, hold down alt as you drag them. This can be pretty helpful when trying to put multiple tokens on the same hex because otherwise they just stack.
As a GM, you can see every player’s various stats. Players can’t see each other’s or yours unless you hit the three dots next to the bar -> Player Permissions -> See. If you want the text on the bars as well, Text Overlay -> Everyone (click the dropdown, then press down arrow and enter - the dropdown is bugged and will usually close if you try to mouse over to the option). I find it helpful to make nameplates for each token and make them visible by clicking that Nameplate box (same thing, look for 3 dots -> Player Permissions -> See). Make sure as the GM that you ask everyone if they can see each other’s stuff because it won’t be obvious to you!
Hopefully this was helpful. Until next time!
Comments
Log in with itch.io to leave a comment.
The drop zone suggestion is a great idea!
Thanks! It’s basically how I do drops in my real-life table too, except I place dice instead of tokens into the appropriate piles (and spin up a counter die for tracking Materials).